aws(学习笔记第二十八课)
- 使用
aws eks
学习内容:
- 什么是
aws eks aws eks的hands onaws eks的创建applicationeks和kubernetes简介
1. 使用aws eks
-
什么是
aws eksaws eks的概念
aws eks是kubernetes在aws上包装出来 的新的方式,旨在更加方便结合aws,在aws上使用kubernetes。实际上aws eks是aws上的managed service。作为执行container的server来说,可以使用EC2或者Fargate都是可以的。aws eks和ECS的区别
区别在于orchestration tool的不同,aws eks使用的kubernetes作为orchestration tool,如果onpromise上使用的是kubernetes,那么同样的架构能够在aws同样使用。
ECS使用的orchestration tool是aws独自的,智能在aws上使用。- 什么是
orchestration tool
orchestration tool是指一种用于协调和管理系统资源、服务和应用程序的工具,以确保它们能够高效、可靠地运行。这种工具通常用于自动化和优化资源的分配和管理,特别是在云计算和容器化环境中。
-
aws eks的架构

-
aws上的示例程序
aws上提供了示例程序,能够使用练习eks
eks的示例程序
2. aws eks的hands on
- 环境(软件安装)准备
- 练习用的
ec2
这里依然采用方便的cloudshell进行练习 aws cli的版本确认aws --version- 安装
eksctlcurl --silent --location "https://github.com/weaveworks/eksctl/releases/latest/download/eksctl_$(uname -s)_amd64.tar.gz" | tar xz -C /tmp eksctl version - 安装
kubectl
如果使用cloudshell,不用安装kubectl,如果使用的EC2,那么执行下面的命令。curl -o kubectl https://amazon-eks.s3.us-west-2.amazonaws.com/1.18.8/2020-09-18/bin/linux/amd64/kubectl chmod +x ./kubectl sudo mv ./kubectl /usr/local/bin kubectl version --client
- 练习用的
- 对于需要的权限设定
role进行作成eksClusterRole的创建
这里的role主要是赋予给eks服务足够的权利。role的名字是eksClusterRole。
保存到文件,之后使用cloudformation进行创建role的操作。AWSTemplateFormatVersion: '2010-09-09' Description: 'Amazon EKS Cluster Role'Resources:eksClusterRole:Type: 'AWS::IAM::Role'Properties:AssumeRolePolicyDocument:Version: '2012-10-17'Statement:- Effect: AllowPrincipal:Service:- eks.amazonaws.comAction:- sts:AssumeRoleManagedPolicyArns:- arn:aws:iam::aws:policy/AmazonEKSClusterPolicyOutputs:RoleArn:Description: 'The role that Amazon EKS will use to create AWS resources for Kubernetes clusters'Value: !GetAtt eksClusterRole.ArnExport:Name: !Sub '${AWS::StackName}-RoleArn'eks-nodegroup-role的创建
还需要创建work node的需要的权限role,这个代码由aws提供。
-> aws work node role link
AWSTemplateFormatVersion: "2010-09-09"Description: Amazon EKS - Node Group RoleMappings:ServicePrincipals:aws-cn:ec2: ec2.amazonaws.com.cnaws-us-gov:ec2: ec2.amazonaws.comaws:ec2: ec2.amazonaws.comResources:NodeInstanceRole:Type: "AWS::IAM::Role"Properties:AssumeRolePolicyDocument:Version: "2012-10-17"Statement:- Effect: AllowPrincipal:Service:- !FindInMap [ServicePrincipals, !Ref "AWS::Partition", ec2]Action:- "sts:AssumeRole"ManagedPolicyArns:- !Sub "arn:${AWS::Partition}:iam::aws:policy/AmazonEKSWorkerNodePolicy"- !Sub "arn:${AWS::Partition}:iam::aws:policy/AmazonEKS_CNI_Policy"- !Sub "arn:${AWS::Partition}:iam::aws:policy/AmazonEC2ContainerRegistryReadOnly"Path: /Outputs:NodeInstanceRole:Description: The node instance roleValue: !GetAtt NodeInstanceRole.Arn - 创建
eks所在的vpc- 使用
cloudformation来创建vpc
这个vpc的创建json由aws提供示例代码。->eks所在的vpc示例json
这里在subnet指定采用了hardcoding,如果不进行hardcoding发现总是提示错误,暂定对应。--- AWSTemplateFormatVersion: '2010-09-09' Description: 'Amazon EKS Sample VPC - Public subnets only'Parameters:VpcBlock:Type: StringDefault: 192.168.0.0/16Description: The CIDR range for the VPC. This should be a valid private (RFC 1918) CIDR range.Subnet01Block:Type: StringDefault: 192.168.64.0/18Description: CidrBlock for subnet 01 within the VPCSubnet02Block:Type: StringDefault: 192.168.128.0/18Description: CidrBlock for subnet 02 within the VPCSubnet03Block:Type: StringDefault: 192.168.192.0/18Description: CidrBlock for subnet 03 within the VPC. This is used only if the region has more than 2 AZs.Metadata:AWS::CloudFormation::Interface:ParameterGroups:-Label:default: "Worker Network Configuration"Parameters:- VpcBlock- Subnet01Block- Subnet02Block- Subnet03BlockConditions:Has2Azs:Fn::Or:- Fn::Equals:- {Ref: 'AWS::Region'}- ap-south-1- Fn::Equals:- {Ref: 'AWS::Region'}- ap-northeast-2- Fn::Equals:- {Ref: 'AWS::Region'}- ca-central-1- Fn::Equals:- {Ref: 'AWS::Region'}- cn-north-1- Fn::Equals:- {Ref: 'AWS::Region'}- sa-east-1- Fn::Equals:- {Ref: 'AWS::Region'}- us-west-1HasMoreThan2Azs:Fn::Not:- Condition: Has2AzsResources:VPC:Type: AWS::EC2::VPCProperties:CidrBlock: !Ref VpcBlockEnableDnsSupport: trueEnableDnsHostnames: trueTags:- Key: NameValue: !Sub '${AWS::StackName}-VPC'InternetGateway:Type: "AWS::EC2::InternetGateway"VPCGatewayAttachment:Type: "AWS::EC2::VPCGatewayAttachment"Properties:InternetGatewayId: !Ref InternetGatewayVpcId: !Ref VPCRouteTable:Type: AWS::EC2::RouteTableProperties:VpcId: !Ref VPCTags:- Key: NameValue: Public Subnets- Key: NetworkValue: PublicRoute:DependsOn: VPCGatewayAttachmentType: AWS::EC2::RouteProperties:RouteTableId: !Ref RouteTableDestinationCidrBlock: 0.0.0.0/0GatewayId: !Ref InternetGatewaySubnet01:Type: AWS::EC2::SubnetMetadata:Comment: Subnet 01Properties:MapPublicIpOnLaunch: trueAvailabilityZone: ap-northeast-1aCidrBlock:Ref: Subnet01BlockVpcId:Ref: VPCTags:- Key: NameValue: !Sub "${AWS::StackName}-Subnet01"- Key: kubernetes.io/role/elbValue: 1Subnet02:Type: AWS::EC2::SubnetMetadata:Comment: Subnet 02Properties:MapPublicIpOnLaunch: trueAvailabilityZone: ap-northeast-1cCidrBlock:Ref: Subnet02BlockVpcId:Ref: VPCTags:- Key: NameValue: !Sub "${AWS::StackName}-Subnet02"- Key: kubernetes.io/role/elbValue: 1Subnet03:Condition: HasMoreThan2AzsType: AWS::EC2::SubnetMetadata:Comment: Subnet 03Properties:MapPublicIpOnLaunch: trueAvailabilityZone: ap-northeast-1dCidrBlock:Ref: Subnet03BlockVpcId:Ref: VPCTags:- Key: NameValue: !Sub "${AWS::StackName}-Subnet03"- Key: kubernetes.io/role/elbValue: 1Subnet01RouteTableAssociation:Type: AWS::EC2::SubnetRouteTableAssociationProperties:SubnetId: !Ref Subnet01RouteTableId: !Ref RouteTableSubnet02RouteTableAssociation:Type: AWS::EC2::SubnetRouteTableAssociationProperties:SubnetId: !Ref Subnet02RouteTableId: !Ref RouteTableSubnet03RouteTableAssociation:Condition: HasMoreThan2AzsType: AWS::EC2::SubnetRouteTableAssociationProperties:SubnetId: !Ref Subnet03RouteTableId: !Ref RouteTableControlPlaneSecurityGroup:Type: AWS::EC2::SecurityGroupProperties:GroupDescription: Cluster communication with worker nodesVpcId: !Ref VPCOutputs:SubnetIds:Description: All subnets in the VPCValue:Fn::If:- HasMoreThan2Azs- !Join [ ",", [ !Ref Subnet01, !Ref Subnet02, !Ref Subnet03 ] ]- !Join [ ",", [ !Ref Subnet01, !Ref Subnet02 ] ]SecurityGroups:Description: Security group for the cluster control plane communication with worker nodesValue: !Join [ ",", [ !Ref ControlPlaneSecurityGroup ] ]VpcId:Description: The VPC IdValue: !Ref VPC
- 使用
- 在
eks所在的vpc中创建eks cluster-
选择自定义配置
注意,这里千万不要选择EKS自治模式-全新,如果选择,后面创建的work node会出现错误!
-
设定
cluster名字和role
这里设定eks-cluster,role选择上面创建的eksClusterRole。

-
设置
IAM角色
这里设置administor的权限,ec-role。

-
ec2-role的权限设定

-
设置
vpc
这里设置前面已经创建的vpc。

-
集群端点访问设定
这里设置成public

-
等待
cluster创建
这里大概要等待10分钟

-
- 在
eks所在的cluster中创建kubeconfig- 作成
kubeconfig文件
如果不做成kubeconfig文件,无法访问eks cluster。aws eks --region ap-northeast-1 update-kubeconfig --name eks-cluster
- 作成
- 尝试链接
eks所在的cluster- 链接测试
kubectl get svc
- 链接测试
- 作成
eks cluster中的work node- 启动
work node group

- 这是
work node group的名字和IAM role
这里设定的role就是前面创建的role。名字设置为work-node-group。

- 设定
ec2 type,节点数和磁盘大小

- 等待
work node group创建,这里需要5分钟

- 检查
ec2
可以看到这里作成了三个ec2 instances。

- 启动
3. aws eks的创建application
-
部署
redis数据库- 使用下面的
github上的官方sample程序
redis-master-controllergit clone https://github.com/kubernetes/examples.git cd examples/guestbook-go - 之后进入
example文件夹,启动redis controllerkubectl apply -f redis-master-controller.yaml
- 启动
redis servicekubectl apply -f redis-master-service.yaml
- 使用下面的
-
部署
guest-book服务- 启动
guest-bookkubectl apply -f guestbook-controller.yaml kubectl apply -f guestbook-service.yaml - 确定
external ip
这里看出kubectl get pod,svc -o wideexternal ip没有已经成功。[cloudshell-user@ip-10-132-94-203 guestbook-go]$ kubectl get pod,svc -o wide NAME READY STATUS RESTARTS AGE IP NODE NOMINATED NODE READINESS GATES pod/guestbook-fpcrt 1/1 Running 0 36s 192.168.140.31 ip-192-168-187-37.ap-northeast-1.compute.internal <none> <none> pod/guestbook-gm9sh 1/1 Running 0 36s 192.168.115.254 ip-192-168-101-164.ap-northeast-1.compute.internal <none> <none> pod/guestbook-l8hkb 1/1 Running 0 36s 192.168.200.226 ip-192-168-226-52.ap-northeast-1.compute.internal <none> <none> pod/redis-master-tl8wh 1/1 Running 0 70s 192.168.190.37 ip-192-168-187-37.ap-northeast-1.compute.internal <none> <none>NAME TYPE CLUSTER-IP EXTERNAL-IP PORT(S) AGE SELECTOR service/guestbook LoadBalancer 10.100.160.68 a2a85261d601c46049d98728d4861990-1486435799.ap-northeast-1.elb.amazonaws.com 3000:30560/TCP 26s app=guestbook service/kubernetes ClusterIP 10.100.0.1 <none> 443/TCP 169m <none> service/redis-master ClusterIP 10.100.153.210 <none> 6379/TCP 49s app=redis,role=master
- 启动
-
访问
guest-book服务http://a2a85261d601c46049d98728d4861990-1486435799.ap-northeast-1.elb.amazonaws.com:3000guest-book服务启动成功。
4. aws eks和kubernetes简介
-
关于
aws eks和kubernetes
EKS(Elastic Kubernetes Service)就是aws提供的managed Kubenetes服务。通过aws的managed封装,能够便利的管理Kubenetes服务,减轻运用的负担。并且,通过aws的managed服务,更好的利用kubenetes提供的各种resource。
Kubenetes(K8S)是Google公司开发的Borg项目为基础的OSS(Open Source Software)。Kubenetes(K8S)能够对container化的应用程序进行部署(deploy),自动的scaling,并且进行管理。非常多的云(cloud)提供商的系统本身就是使用的Kubenetes。
以下是Kubenetes的整体架构。

-
什么是
Control Plain(master node)
Control Plain(master node)就是集群cluster内部的work node和container管理的节点node。在eks cluster之后存在着两种节点。Control Plain(master node)work node
Control Plain(master node)保持着kubernetes中对象的状态,接受从client来的command,进行API Action的执行,进行container部署。或者,schduler在Control Plain(master node)进行动作,通知work node上的kubelet(agent)进行动作。kubelet(agent),接受Control plain(master)的指示启动container。 -
什么是
work node
work node就是实际上就是接受Control Plain(master node)的指示,启动container。work node既可以选择ec2,也可以选择fargate。 -
aws eks的构成

-
什么是工作负载
workload resource
工作负载workload resource指的是在kubenetes上执行的应用程序application。这里面包括Pod,ReplicaSet,Deployment,DaemonSet,Job等资源。
这些资源,通过kubectl命令,读取资源设定的yaml manifest文件,进行部署(deploy)。 -
关于
kubectl
kubectl的命令如下:kubectl [command] [type] [name]command指的是对于resource执行的action,如apply, get, describe, delete。
type是resource的类型,包括pod, replicasets, deployment。
name是实际上的resource name。如果省略的场合,那么就是default。
如下的命令示例。kubectl get pods #work node上所有的pod kubectl apply -f shun.yml #执行manifest文件进行部署 kubectl describe nodes shun #详细描述node shun -
关于
pod
pod是kubenetes里面管理resouces的最小单位。一个pod里面包含一个或者多个container。包含多个container的pod里面会有辅助作用的container,一般称为sidecar。
下面是一个包含一个ngnix的container的pod定义。apiVersion: v1 kind: Pod metadata:name: nginxnamespace: ns-shun spec:containers:- name: nginximage: nginx:1.14.1ports:- containerPort: 80这里
kind表示object的类型。包括od, ReplicaSet, Deployment等等。
metadata包括object的唯一识别信息,tag和namespace。
spec是这个object的详细信息,包括container name,container image,listening port。
8.什么是namespace
namespace是kubenetes的cluster中,分割resource的作用,使用namespace,能够对work node上的多个container进行分割管理。例如,application container和listener container进行分开管理。如果不指定namespace那么缺省都是default。 -
什么是
ReplicaSet
ReplicaSet指的是一直让指定数量的pod执行起来的resource。例如,让3个pod一起执行,replicas剋设定pod的台数,selector设定ReplicaSet管理的pod的标签。以下,是这个例子。apiVersion: apps/v1 kind: ReplicaSet metadata:name: nginx spec:replicas: 3selector:matchLabels:app: nginxtemplate:metadata:labels:app: nginxspec:containers:- name: nginximage: nginx:1.14.1ports:- containerPort: 80 -
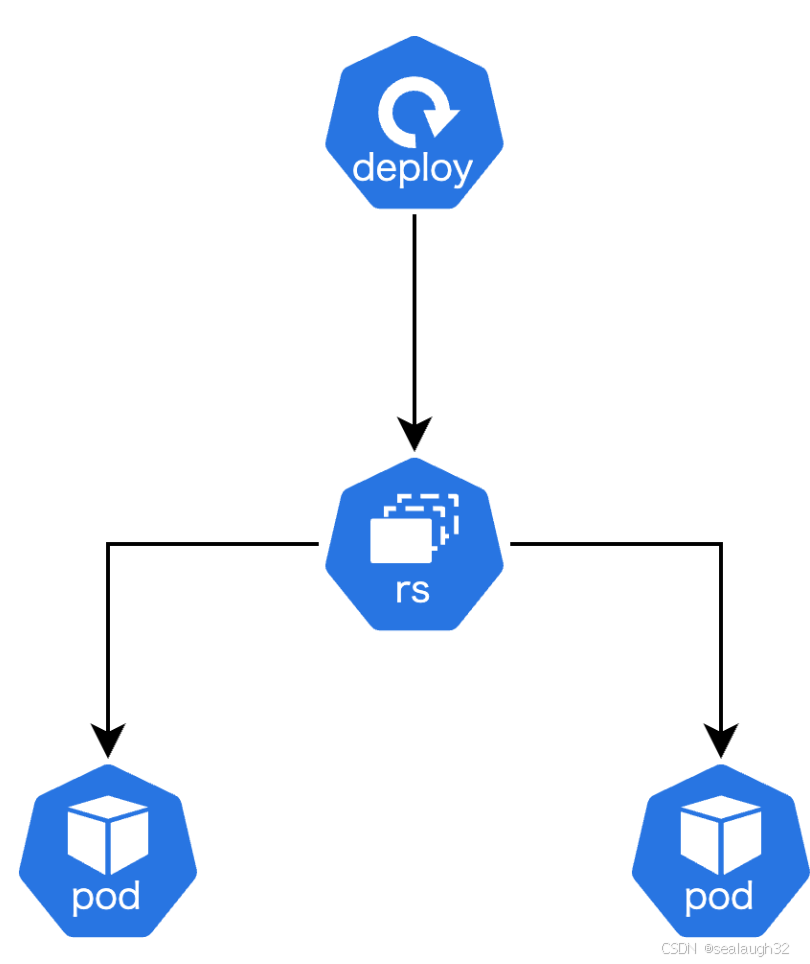
什么是
workload resource的父子关系
deployment是ReplicaSet的父亲resource,ReplicaSet是pod的父亲resource。
-
什么是
Deployment
Deployment是实现rolling update或者rollback的resource。参照文章
ReplicaSet不能直接支持rolling update或者rollback,但是使用Deployment的话,能够实现。deployment管理多个ReplicaSet。下面是Deployment的例子。
yaml apiVersion: apps/v1 kind: Deployment metadata: name: nginx spec: replicas: 3 selector: matchLabels: app: nginx template: metadata: labels: app: nginx spec: containers: - name: nginx image: nginx:1.14.1 ports: - containerPort: 80
这里,version up的时候,默认采用roling update的方式。实际上,version up的方式有两种,一种是所有的pod都删除之后,重新作成pod的Recreate的方式,还有一种就是对pod进行逐步升级的rolling update。 -
其他类型的
workload resourceDaemonSet
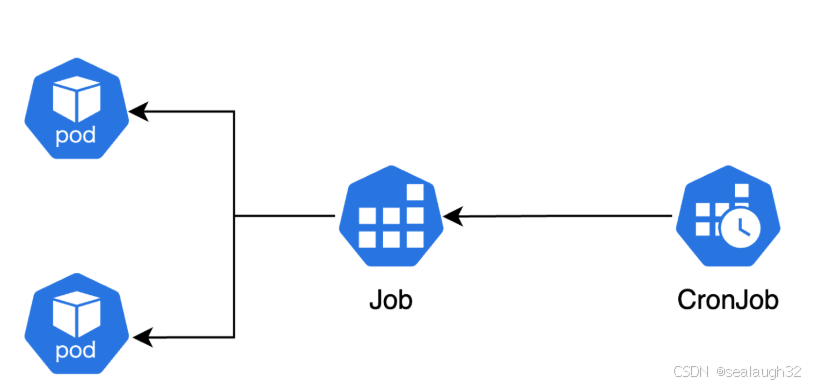
这种类型的workload resource就是对于每个node节点配置一个resource,比如说Datadog Agent, Fluentbit。Job
指定回数进行处理Job的resource。Job执行之后就会完了。
Cronjob
执行指定时间的Job。
StatefulSet
使用Database等等的StatefulSet,Pod名字不变,循环suffix连续进行赋予编号。(例:shun-stateful-0, shun-stateful-1, shun-stateful-2)。
-
其他类型的
API
Workloads APIs是关于执行container相关的resource的。
Service APIs是关于将系统向外部公开的resource。
Config & Storage APIs是关于设定情报和存储volume的resource的。 -
Service APIs
这里eks开始整合kubenetes,一旦在kubenetes中定义了LoadBalancer类型的Service,那么就会自动生成aws上的Elastic Load Balancer(ELB)。并且适当的为work node上的service进行路由。下面是LoadBalancer类型的Service的sample。apiVersion: apps/v1 kind: Deployment metadata:name: my-app spec:replicas: 3selector:matchLabels:app: my-apptemplate:metadata:labels:app: my-appspec:containers:- name: my-appimage: my-app-image:latestports:- containerPort: 8080这里是
LoadBalancer的定义。apiVersion: v1 kind: Service metadata:name: my-service spec:type: LoadBalancer # 或者是 ClusterIPports:- port: 80targetPort: 8080selector:app: my-app -
Ingress resoure,Ingress controller和Service
作成Ingress resoure,使外部的http/https流量导入到cluster内部的service的场合,需要ingress controller。在eks中,使用nginx ingress controller或者AWS Load Balancer Contrller。下面是例子。apiVersion: networking.k8s.io/v1 kind: Ingress metadata:name: my-ingressannotations:kubernetes.io/ingress.class: alb # or nginxalb.ingress.kubernetes.io/scheme: internet-facingalb.ingress.kubernetes.io/target-type: ipalb.ingress.kubernetes.io/listen-ports: '[{"HTTP": 80}]' spec:ingressClassName: alb # or nginxrules:- host: example.comhttp:paths:- path: /pathType: Prefixbackend:service:name: my-serviceport:number: 80ClusterIP服务apiVersion: v1 kind: Service metadata:name: my-service spec:type: ClusterIP # or LoadBalancer, if you want to expose the service externallyports:- port: 80targetPort: 8080selector:app: my-appdeployment服务apiVersion: apps/v1 kind: Deployment metadata:name: my-app spec:replicas: 3selector:matchLabels:app: my-apptemplate:metadata:labels:app: my-appspec:containers:- name: my-appimage: my-app-image:latestports:- containerPort: 8080