再接入nacos配置中心时,需要确认几点:
1. spring boot 版本 (spring boot 2.x )
2. nacos 配置中心 服务端 版本 (1.1.4)
3. nacos client 客户端版本 (1.1.4)
方式一
1. 启动 nacos 服务端,这里不做解释
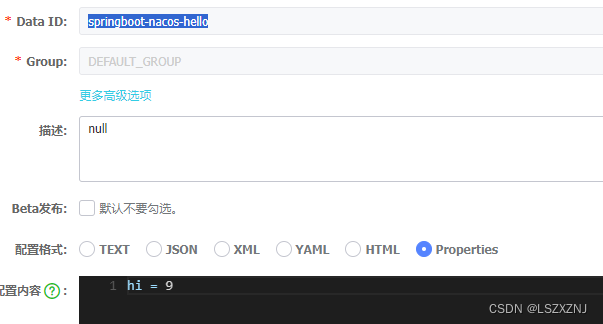
在配置中心中加入几个配置
2. 在自己的应用里引入 依赖包
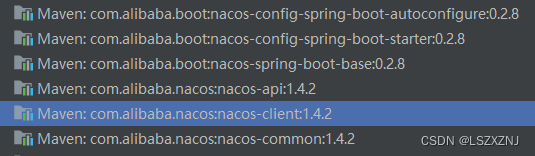
<dependency><groupId>com.alibaba.boot</groupId><artifactId>nacos-config-spring-boot-starter</artifactId><version>0.2.8</version></dependency>注意, nacos-config-spring-boot-starter 的版本内 引入了 nacos-client,需要注意引入的版本 是否与nacos服务端匹配。如果不匹配,可能会有问题。
这里使用的 nacos 服务端 是 1.x版本,所有引入的包也是1.x的才可以。
3. 配置 nacos 服务端地址
nacos.config.server-addr= localhost:8848
4. 在spring boot 启动类 加入 注解
如果是 只有一个 dataId,使用 @NacosPropertySource
如果有 多个 dataId,使用 @NacosPropertySources
@SpringBootApplication
@NacosPropertySources({@NacosPropertySource(dataId = "springboot-nacos-hello", autoRefreshed = true,type = ConfigType.PROPERTIES),@NacosPropertySource(dataId = "useLocalCache", autoRefreshed = true,type = ConfigType.PROPERTIES)
})
public class NacostestApplication {public static void main(String[] args) {SpringApplication.run(NacostestApplication.class, args);}}
5. 读取 配置
使用 注解 @NacosValue
@NacosValue(value = "${hi}", autoRefreshed = true)private String useLocalCache;方式二:
引入依赖
<dependency><groupId>com.alibaba.nacos</groupId><artifactId>nacos-client</artifactId><version>1.1.4</version></dependency>直接调用api
@Component
public class ConfigS {@Beanpublic ConfigService configService() {try {Properties properties = new Properties();properties.setProperty("serverAddr", "localhost:8848");ConfigService configService = NacosFactory.createConfigService(properties);configService.addListener("springboot-nacos-hello", "DEFAULT_GROUP", new Listener() {@Overridepublic Executor getExecutor() {return null;}@Overridepublic void receiveConfigInfo(String configInfo) {// 配置更新处理逻辑System.out.printf(configInfo);}});return configService;} catch (Exception e) {return null;}}
}configService.getConfig("springboot-nacos-hello","DEFAULT_GROUP",10000)这种方式 只是简单的拉去配置中心的内容,需要自己解析 配置内容和监听更新