目录
一.Nginx介绍
1.Nginx功能介绍
2.基础特性
3.Web服务相关的功能
4.I/O模型相关概念
5.nginx模块
6.Nginx文件存放位置
7.Nginx事件驱动模型
二.平滑升级及信号使用
1.Nginx 程序当作命令使用
2.信号类型
3.平滑升级nginx
4.回滚
三.Nginx调优
1.隐藏版本号或修改名称
2.修改worker进程数和cpu一致
3.cpu亲缘绑定
4.提高nginx进程的优先级
5.设置nginx可以打开文件的上限,需要和系统limit参数配合
一.Nginx介绍
1.Nginx功能介绍
-
静态的web资源服务器html,图片,js,css,txt等静态资源
-
http/https协议的反向代理 ,7层 url
-
结合FastCGI /uWSGI/SCGI等协议反向代理动态资源请求
-
tcp/udp协议的请求转发(反向代理) 4层
2.基础特性
-
模块化设计,较好的扩展性
-
高可靠性
-
支持热部署:不停机更新配置文件,升级版本,更换日志文件
-
低内存消耗:10000个keep-alive连接模式下的非活动连接,仅需2.5M内存
-
event-driven, aio, mmap,sendfile
3.Web服务相关的功能
-
虚拟主机(server)
-
支持 keep-alive 和管道连接(利用一个连接做多次请求)
-
访问日志(支持基于日志缓冲提高其性能)
-
url rewirte
-
路径别名
-
基于IP及用户的访问控制
-
支持速率限制及并发数限制
-
重新配置和在线升级而无须中断客户的工作进程
4.I/O模型相关概念
①Nginx服务使用异步非阻塞模式:请求不需要排队,会反馈任务的完成结果。
②Apache服务使用同步阻塞模式:请求需要排队,且不会主动返回结果。
③同步/异步:关注的是消息通信机制,即调用者在等待一件事情的处理结果时。被调用者是否提供完成。
④同步:调用者需要主动询问结果。
⑤异步:调用者不需要主动询问结果,被调用者会主动返回结果。
⑥阻塞:系统同时只能处理1个请求,另外的请求需要排队。
⑦非阻塞:系统同时处理多个请求。
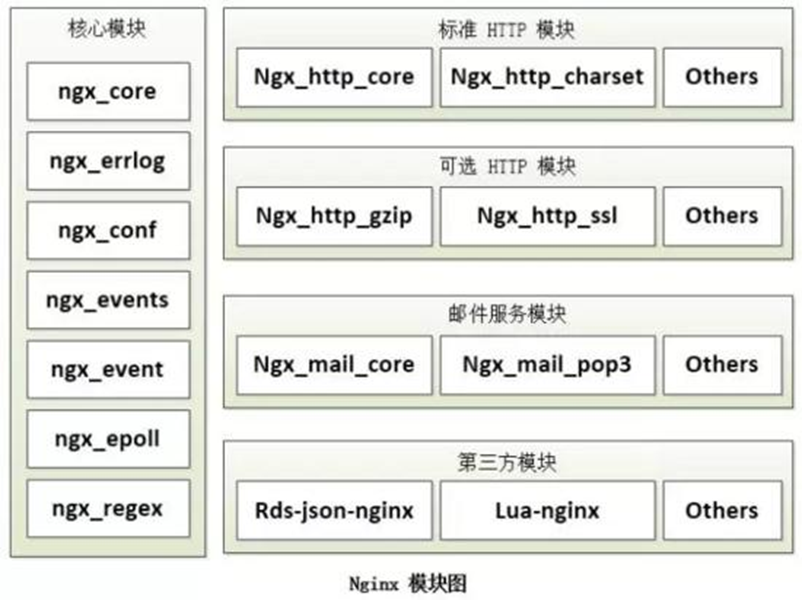
5.nginx模块
-
核心模块:是 Nginx 服务器正常运行必不可少的模块,提供错误日志记录 、配置文件解析 、事件驱动机制 、进程管理等核心功能
-
标准HTTP模块:提供 HTTP 协议解析相关的功能,比如: 端口配置 、 网页编码设置 、 HTTP响应头设置 等等
-
可选HTTP模块:主要用于扩展标准的 HTTP 功能,让 Nginx 能处理一些特殊的服务,比如:Flash 多媒体传输 、解析 GeoIP 请求、 网络传输压缩 、 安全协议 SSL 支持等
-
邮件服务模块:主要用于支持 Nginx 的 邮件服务 ,包括对 POP3 协议、 IMAP 协议和 SMTP协议的支持
-
Stream服务模块: 实现反向代理功能,包括TCP协议代理 四层
-
第三方模块:是为了扩展 Nginx 服务器应用,完成开发者自定义功能,比如: Json 支持、 Lua 支持等
常用模块
ngx_http_core_module 核心模块
ngx_http_access_module 访问控制
ngx_http_auth_basic_module 身份验证
ngx_http_gzip_module 压缩模块
ngx_http_log_module 日志模块
ngx_http_proxy_module 代理模块
ngx_http_rewrite_module 重写模块
ngx_http_stub_status_module 状态页模块
ngx_http_upstream_module 反向代理
ngx_http_stream_module 四层代理
6.Nginx文件存放位置
| 安装方式 | 日志文件 | 配置文件 | 默认主站点 |
| ubuntu 编译 | 安装目录下 logs目录下 | 安装目录下 conf目录下 | 安装目录下 html 目录下/index.html |
| centos7编译 | 安装目录下 logs目录下 | 安装目录下 conf目录下 | 安装目录下 html 目录下/index.html |
| apt | /var/log/nginx/ | /etc/nginx/nginx.conf | /var/www/html/index.html |
| yum | /var/log/nginx/ | /etc/nginx/nginx.conf | /usr/share/nginx/html/index.html |
7.Nginx事件驱动模型
①select:一个应用程序,代理系统功能处理异步请求,最大连接数是1024个。
它仅仅知道了,有I/O事件发生了,却并不知道是哪那几个流(可能有一个,多个,甚至全部),我们只能无差别轮询所有流,找出能读出数据,或者写入数据的流,对他们进行操作。所以select具有O(n)的无差别轮询复杂度,同时处理的流越多,无差别轮询时间就越长。
②poll:select加强版取消了1024最大连接数。
poll本质上和select没有区别,它将用户传入的数组拷贝到内核空间,然后查询每个fd对应的设备状态, 但是它没有最大连接数的限制,原因是它是基于链表来存储的。
③epoll:poll的加强版。
epoll可以理解为event poll,不同于忙轮询和无差别轮询,epoll会把哪个流发生了怎样的I/O事件通知我们。所以我们说epoll实际上是事件驱动(每个事件关联上fd)的,此时我们对这些流的操作都是有意义的。
二.平滑升级及信号使用
1.Nginx 程序当作命令使用
nginx -v 显示当前程序版本
常用选项
-V 显示当前程序版本及编译信息
-t 检测配置文件是否有错误
-T 检测配置文件是否有错误,并打印当前配置文件
nginx 启动nginx服务
| nginx命令 | kill命令 | 含义 |
|---|---|---|
| nginx -s relaod | kill -s HUP | 重新加载配置文件 |
| nginx -s stop | kill -9(KILL) | 立即停止 |
| nginx -s quit | kill -3(QUITt) | 优雅的退出 |
| nginx -s reopen | kill -s USR1 | 重新生成日志文件 |
| nginx | kill -s USR2 | 飞行中升级 |
2.信号类型
stop SIGTERM 直接停止
quit SIGQUIT 优雅的退出:有人在访问不会结束进程
reopen SIGUSR1 分割日志
reload SIGHUP 重新加载配置文件
SIGQUIT Shut down gracefully. 优雅的关闭:有人在访问不会结束进程
SIGUSR1 Reopen log files. 重新分割日志
SIGUSR2 Upgrade the nginx executable on the fly. 运行中升级
SIGWINCH Shut down worker processes gracefully. 优雅的关闭worker进程,work进程负责处理请求,还有请求不会关闭
3.平滑升级nginx
-
将旧Nginx文件换成新Nginx文件(注意备份)
-
向master进程发送USR2信号
-
master进程修改pid文件名,加后缀.oldbin
-
master进程用新Nginx文件启动新master进程,系统中将有新旧两个Nginx主进程共同提供Web服务
-
向旧的Nginx服务进程发送WINCH信号,使旧的Nginx worker进程平滑停止,并删除Nginx.pid.oldbin文件
-
向旧master进程发送QUIT信号,关闭老master
-
如果发现升级有问题,可以回滚向老master发送HUP,向新master发送QUIT
具体步骤:
ps aux |grep nginx
#先查看是否开启nginx
root 26603 0.0 0.0 46204 1160 ? Ss 04:58 0:00 nginx: master process /apps/nginx/sbin/nginx -c /apps/nginx/conf/nginx.conf
nginx 26604 0.0 0.1 48736 2240 ? S 04:58 0:00 nginx: worker process
root 30924 0.0 0.0 118744 1152 pts/1 S+ 10:10 0:00 man /opt/nginx-1.18.0/man/nginx.8
root 31035 0.0 0.0 112824 976 pts/2 S+ 10:16 0:00 grep --color=auto nginx
[root@localhost ~]#vim /apps/nginx/conf/nginx.conf
#开启 两核
#user nobody;
worker_processes 2;
#worker_processes 1 原来是1核
[root@localhost ~]#nginx -s reload
#重新加载配置文件
[root@localhost ~]#ps aux |grep nginx
root 26603 0.0 0.1 46344 2012 ? Ss 04:58 0:00 nginx: master process /apps/nginx/sbin/nginx -c /apps/nginx/conf/nginx.conf
root 30924 0.0 0.0 118744 1152 pts/1 S+ 10:10 0:00 man /opt/nginx-1.18.0/man/nginx.8
nginx 31132 0.0 0.1 48856 2092 ? S 10:17 0:00 nginx: worker process
nginx 31133 0.0 0.1 48856 2080 ? S 10:17 0:00 nginx: worker process
##此处多了一个子进程
root 31158 0.0 0.0 112824 972 pts/2 S+ 10:19 0:00 grep --color=auto nginx
[root@localhost ~]#ps auxf |grep nginx
#查看进程树
root 30924 0.0 0.0 118744 1152 pts/1 S+ 10:10 0:00 | \_ man /opt/nginx-1.18.0/man/nginx.8
root 31184 0.0 0.0 112824 976 pts/2 S+ 10:20 0:00 \_ grep --color=auto nginx
root 26603 0.0 0.1 46344 2012 ? Ss 04:58 0:00 nginx: master process /apps/nginx/sbin/nginx -c /apps/nginx/conf/nginx.conf
nginx 31132 0.0 0.1 48856 2092 ? S 10:17 0:00 \_ nginx: worker process
nginx 31133 0.0 0.1 48856 2080 ? S 10:17 0:00 \_ nginx: worker process
[root@localhost ~]#wget https://nginx.org/download/nginx-1.20.2.tar.gz -P /usr/local/src/
#下载安装包到src目录
[root@localhost ~]#cd /usr/local/src/
[root@localhost src]#ls
nginx-1.20.2.tar.gz
[root@localhost src]#tar xf nginx-1.20.2.tar.gz
[root@localhost src]#cd nginx-1.20.2/
[root@localhost nginx-1.20.2]#ls
auto CHANGES CHANGES.ru conf configure contrib html LICENSE man README src
############################################################################
# 这时需要重新编译安装 ./configure 安装参数基本一致 这时可以使用 nginx -V 查看 #
############################################################################
[root@localhost nginx-1.20.2]#nginx -V
nginx version: nginx/1.18.0
built by gcc 4.8.5 20150623 (Red Hat 4.8.5-44) (GCC)
built with OpenSSL 1.0.2k-fips 26 Jan 2017
TLS SNI support enabled
configure arguments: --prefix=/apps/nginx --user=nginx --group=nginx --with-http_ssl_module --with-http_v2_module --with-http_realip_module --with-http_stub_status_module --with-http_gzip_static_module --with-pcre --with-stream --with-stream_ssl_module --with-stream_realip_module
########################################################################
如果 有新模块在后添加即可
########################################################################
[root@localhost nginx-1.20.2]#./configure --prefix=/apps/nginx --user=nginx --group=nginx --with-http_ssl_module --with-http_v2_module --with-http_realip_module --with-http_stub_status_module --with-http_gzip_static_module --with-pcre --with-stream --with-stream_ssl_module --with-stream_realip_module
#重新编译
[root@localhost nginx-1.20.2]#make
###########注意不要执行 make install######
[root@localhost objs]#cd objs
#此文件夹中有新版本的nginx 运行程序
[root@localhost nginx-1.20.2]#objs/nginx -v
#查看版本
nginx version: nginx/1.20.2
[root@localhost nginx-1.20.2]#mv /apps/nginx/sbin/nginx /apps/nginx/sbin/nginx.bak
#将低版本的nginx主程序改名
[root@localhost nginx-1.20.2]#cp objs/nginx /apps/nginx/sbin/
#将新版本 拷入进去
[root@localhost nginx-1.20.2]#ll /apps/nginx/sbin/
总用量 15308
-rwxr-xr-x. 1 root root 7896080 4月 21 10:46 nginx
-rwxr-xr-x. 1 root root 7774624 4月 19 10:43 nginx.bak
[root@localhost nginx-1.20.2]#/apps/nginx/sbin/nginx -t
#检查下语法问题
nginx: the configuration file /apps/nginx/conf/nginx.conf syntax is ok
nginx: configuration file /apps/nginx/conf/nginx.conf test is successful
[root@localhost nginx-1.20.2]#kill -USR2 `cat /apps/nginx/logs/nginx.pid`
#发送 2 信号 信号在 man手册中可以看到
SIGNALS
The master process of nginx can handle the following signals:
SIGINT, SIGTERM Shut down quickly.
SIGHUP Reload configuration, start the new worker process with a new configuration,
and gracefully shut down old worker processes.
SIGQUIT Shut down gracefully.
SIGUSR1 Reopen log files.
SIGUSR2 Upgrade the nginx executable on the fly.
# 飞行中升级
SIGWINCH Shut down worker processes gracefully.
While there is no need to explicitly control worker processes normally, they support some sig‐
nals too:
SIGTERM Shut down quickly.
SIGQUIT Shut down gracefully.
SIGUSR1 Reopen log files.
[root@localhost nginx-1.20.2]#ps auxf|grep nginx
#生成新的master
root 34765 0.0 0.0 112824 976 pts/2 S+ 10:53 0:00 \_ grep --color=auto nginx
root 26603 0.0 0.1 46344 2012 ? Ss 04:58 0:00 nginx: master process /apps/nginx/sbin/nginx -c /apps/nginx/conf/nginx.conf
nginx 31132 0.0 0.1 48856 2092 ? S 10:17 0:00 \_ nginx: worker process
nginx 31133 0.0 0.1 48856 2080 ? S 10:17 0:00 \_ nginx: worker process
root 34761 0.0 0.1 46220 3360 ? S 10:53 0:00 \_ nginx: master process /apps/ngin/sbin/nginx -c /apps/nginx/conf/nginx.conf
nginx 34762 0.0 0.1 48756 1988 ? S 10:53 0:00 \_ nginx: worker process
nginx 34763 0.0 0.1 48756 1988 ? S 10:53 0:00 \_ nginx: worker process
[root@localhost nginx-1.20.2]#lsof -i :80
#查看谁在监听 80
COMMAND PID USER FD TYPE DEVICE SIZE/OFF NODE NAME
nginx 26603 root 6u IPv4 73696 0t0 TCP *:http (LISTEN)
nginx 31132 nginx 6u IPv4 73696 0t0 TCP *:http (LISTEN)
nginx 31133 nginx 6u IPv4 73696 0t0 TCP *:http (LISTEN)
nginx 34761 root 6u IPv4 73696 0t0 TCP *:http (LISTEN)
nginx 34762 nginx 6u IPv4 73696 0t0 TCP *:http (LISTEN)
nginx 34763 nginx 6u IPv4 73696 0t0 TCP *:http (LISTEN)
检验
[root@localhost html]#dd if=/dev/zero of=/apps/nginx/html/m.img bs=1G count=10
记录了10+0 的读入
记录了10+0 的写出
10737418240字节(11 GB)已复制,19.3238 秒,556 MB/秒
[root@localhost html]#ls
50x.html index.html m.img
[root@localhost html]#pwd
/apps/nginx/html
#开启新机器下载
[root@localhost data]#wget --limit-rate=1M http://192.168.91.100/m.img
--2022-04-21 11:05:14-- http://192.168.91.100/m.img
正在连接 192.168.91.100:80... 已连接。
已发出 HTTP 请求,正在等待回应... 200 OK
长度:10737418240 (10G) [application/octet-stream]
正在保存至: “m.img”
#回到网页服务器
[root@localhost html]#ss -ntap|grep 80
#查看那个进程在管理 下载
LISTEN 0 128 *:80 *:* users:(("nginx",pid=34763,fd=6),("nginx",pid=34762,fd=6),("nginx",pid=34761,fd=6),("nginx",pid=26603,fd=6))
ESTAB 0 993328 192.168.91.100:80 192.168.91.101:52402 users:(("nginx",pid=34763,fd=7))
[root@localhost man]#ls /apps/nginx/run/
#会有 新老两个进程
nginx.pid nginx.pid.oldbin
[root@localhost man]#cat /apps/nginx/run/nginx.pid.oldbin
26603
[root@localhost man]#kill -WINCH `cat /apps/nginx/logs/nginx.pid.oldbin`
#优雅关闭老进程的 worker 进程
#再开启一台服务器测试 是否是新的进程 在下载
[root@localhost ~]# wget --limit-rate=1M http://192.168.91.100/m.img
--2022-04-21 11:14:36-- http://192.168.91.100/m.img
正在连接 192.168.91.100:80... 已连接。
已发出 HTTP 请求,正在等待回应... 200 OK
长度:10737418240 (10G) [application/octet-stream]
正在保存至: “m.img”
#回到网页服务器可以看到 之前的在 但是又开启了一个 102
[root@localhost html]#ss -ntap|grep 80
LISTEN 0 128 *:80 *:* users:(("nginx",pid=34763,fd=6),("nginx",pid=34762,fd=6),("nginx",pid=34761,fd=6),("nginx",pid=26603,fd=6))
ESTAB 0 993328 192.168.91.100:80 192.168.91.101:52402 users:(("nginx",pid=34763,fd=7))
ESTAB 0 957128 192.168.91.100:80 192.168.91.102:44266 users:(("nginx",pid=34763,fd=12))
测试一段时间无问题 就可以了
[root@localhost html]#pstree -p |grep nginx
#查看进程关系 1.18
|-nginx(26603)
--nginx(work 23333)
--nginx(34761M)-+-nginx(34762)
| 1.20 `-nginx(34763)
4.回滚
[root@localhost man]#kill -HUP `cat /apps/nginx/logs/nginx.pid.oldbin`
#唤起老的进程
[root@localhost man]#ps aux|grep nginx
#又有两个master
root 26603 0.0 0.1 46344 2028 ? Ss 04:58 0:00 nginx: master process /apps/nginx/sbin/nginx -c /apps/nginx/conf/nginx.conf
root 34761 0.0 0.1 46220 3360 ? S 10:53 0:00 nginx: master process /apps/nginx/sbin/nginx -c /apps/nginx/conf/nginx.conf
nginx 34762 0.0 0.1 48756 1988 ? S 10:53 0:00 nginx: worker process
nginx 34763 0.0 0.1 48756 2232 ? S 10:53 0:01 nginx: worker process
nginx 35296 0.0 0.1 48856 2092 ? S 11:25 0:00 nginx: worker process
nginx 35297 0.0 0.1 48856 2092 ? S 11:25 0:00 nginx: worker process
root 35303 0.0 0.0 112824 976 pts/1 S+ 11:26 0:00 grep --color=auto nginx
[root@localhost man]#kill -WINCH `cat /apps/nginx/logs/nginx.pid`
#优雅关闭新进程的worker进程
[root@localhost sbin]#curl -I 127.1
HTTP/1.1 200 OK
Server: nginx/1.18.0
Date: Thu, 21 Apr 2022 03:35:18 GMT
Content-Type: text/html
Content-Length: 612
Last-Modified: Tue, 19 Apr 2022 02:43:17 GMT
Connection: keep-alive
ETag: "625e21c5-264"
Accept-Ranges: bytes
三.Nginx调优
1.隐藏版本号或修改名称
#修改配置文件 放在 http语句中
http {
server_tokens off;
#nginx -s reload
#重新加载
验证
[root@localhost sbin]#curl -I http://192.168.91.100/
HTTP/1.1 200 OK
Server: nginx/1.18.0
Date: Thu, 21 Apr 2022 03:34:51 GMT
Content-Type: text/html
Content-Length: 612
Last-Modified: Tue, 19 Apr 2022 02:43:17 GMT
Connection: keep-alive
ETag: "625e21c5-264"
Accept-Ranges: bytes
[root@localhost sbin]#curl -I http://192.168.91.100/
HTTP/1.1 200 OK
Server: nginx
Date: Thu, 21 Apr 2022 04:04:23 GMT
Content-Type: text/html
Content-Length: 612
Last-Modified: Tue, 19 Apr 2022 02:43:17 GMT
Connection: keep-alive
ETag: "625e21c5-264"
Accept-Ranges: bytes
自行修改
#去修改源码,在安装包里, 再重新编译 #号不要去掉
#先把nginx服务关闭,不然编译不成功
[root@localhost core]#vim /opt/nginx-1.18.0/src/core/nginx.h
13 #define NGINX_VERSION "9527"
14 #define NGINX_VER "http/" NGINX_VERSION
[root@localhost core]#vim /opt/nginx-1.18.0/src/http/ngx_http_header_filter_module.c
49 static u_char ngx_http_server_string[] = "Server: lucky" CRLF;
重新编译安装
./configure --prefix=/apps/nginx --user=nginx --group=nginx --with-http_ssl_module --with-http_v2_module --with-http_realip_module --with-http_stub_status_module --with-http_gzip_static_module --with-pcre --with-stream --with-stream_ssl_module --with-stream_realip_module
[root@localhost nginx-1.18.0]#make && make install
2.修改worker进程数和cpu一致
worker_processes 1;
#允许的启动工作进程数数量,和你真实的cpu数量有关 1
worker_processes auto;
#如果设置为auto 就是你真实的cpu数量
[root@localhost ~]#ps axo pid,cmd,psr,ni|grep nginx
#可以看到 nginx的 worker数量
18620 nginx: master process /usr/ 0 0
18621 nginx: worker process 2 0
18622 nginx: worker process 3 0
18623 nginx: worker process 0 0
18624 nginx: worker process 3 0
18641 grep --color=auto nginx 0 0
3.cpu亲缘绑定
worker_cpu_affinity 00000001 00000010 00000100 00001000;第0号---第3号CPU
#序号绑定cpu 亲缘性
worker_cpu_affinity 00000101 00001010;
#同一个work 可以绑定 两个cpu可以这么写 但是不建议,本来就是 不希望飘动,这样也是飘动
实际操作
例子:
user nginx;
worker_processes auto;
worker_cpu_affinity 00000001 00000010;
#绑定到 第一 和 第二块cpu上
error_log /var/log/nginx/error.log;
#注意 要绑一起绑
[root@localhost ~]#ps axo pid,cmd,psr,ni|grep -v grep |grep nginx|sort -n
18620 nginx: master process /usr/ 2 0
18951 nginx: worker process 0 0
18952 nginx: worker process 1 0
18954 grep --color=auto nginx 2 0
验证cpu乱跑可以刷新网页即可
while true ;do ab -c 1000 -n 1000 http://192.168.91.100/;done
4.提高nginx进程的优先级
ps axo pid,cmd,psr,ni|grep nginx|sort -n
#查看默认优先级,默认优先级为0
18620 nginx: master process /usr/ 3 0
19045 nginx: worker process 0 0
19046 nginx: worker process 1 0
19082 vim /etc/nginx/nginx.conf 1 0
19173 grep --color=auto nginx 1 0
修改配置文件
user nginx;
worker_processes 2;
worker_cpu_affinity 00000101 00000010;
error_log /var/log/nginx/error.log;
pid /run/nginx.pid;
worker_priority -20;
#添加此项
nginx -s reload
[root@localhost ~]#ps axo pid,cmd,psr,ni|grep nginx|sort -n
18620 nginx: master process /usr/ 3 0
19196 nginx: worker process 0 -20
19197 nginx: worker process 1 -20
19199 grep --color=auto nginx 1 0
5.设置nginx可以打开文件的上限,需要和系统limit参数配合
pid /run/nginx.pid;
worker_priority -20;
worker_rlimit_nofile 65536;
#所有worker进程能打开的文件数量上限,包括:Nginx的所有连接(例如与代理服务器的连接等),而不仅仅是与客户端的连接,另一个考虑因素是实际的并发连接数不能超过系统级别的最大打开文件数的限制.最好与ulimit -n 或者limits.conf的值保持一致。
vim /etc/security/limits.conf
#最后加入
* soft core unlimited
* hard core unlimited
* soft nproc 1000000
* hard nproc 1000000
* soft nofile 1000000
* hard nofile 1000000
* soft memlock 32000
* hard memlock 32000
* soft msgqueue 8192000
* hard msgqueue 8192000
#设置完后重启