目录
1. 背景和问题
2. CLIP模型结构
3. 实验效果
4. 源码分析
5. CLIP的局限性和不足
6. 资料
一. 背景和问题
在做分类 检测以及分割任务时,数据的标注非常关键, 比如可用于分类任务的ImageNet数据集共有120万张图片1000个分类, 可用于目标检测和分割任务的COCO数据集共有33万张图片80个目标类别. 传统的图像分类模型通常在标注的数据集上进行训练,但这些数据集的类别和数量相对较小,训练的模型泛化能力也受限,很难直接zero-shot迁移到下游任务.
Transformer在NLP领域大放光彩,在CV领域基于Transformer的VIT等取得了不错的效果, 但这两个领域之间的交互是一个挑战,Clip就是研究这个问题,今天我们开启多模态的学习
由于文章周涉及到不少名词,为了更好的理解,先对其进行解释:
-
Linear-probe: 用于衡量特征提取器性能的一种方法,通过冻结网络的backbone,只对最后一层Fully Connected Layer(全连接层)进行训练,可以更准确的反映预训练模型的好坏.
-
distribution gap: 不同数据集分布上存在一定的差距,导致准确率或者泛化表现差, 例如出现out of distribution(推理的数据和预训练的数据来自不同分布)的情况,这个在画质评测任务中也是经常遇到,eg: 训练数据集大部分来自用户拍摄的白天的图像,那么对于合成的纯色背景加文字或者黑夜场景 推理评测结果就不太好.
-
zero-shot learning: 零样本学习,它是指在没有直接训练数据的情况下,使模型能够识别或者预测新的/未见过的类别. 如下图经典的"斑马案例":假设模型已经能够识别马,老虎和熊猫,现在需要该模型也识别斑马,zero-shot就是不通过训练给模型见斑马的图片,而是在推理时告诉模型斑马有什么特征,模型也可以成功识别出斑马
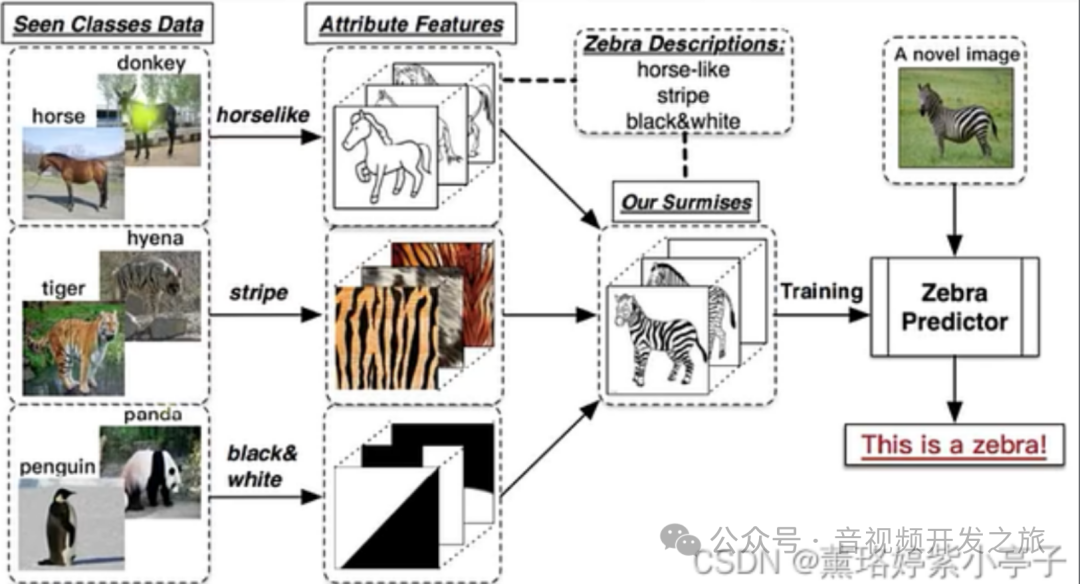
图片来自:Zero-shot, One-shot和Few-shot的理解
二. CLIP模型结构
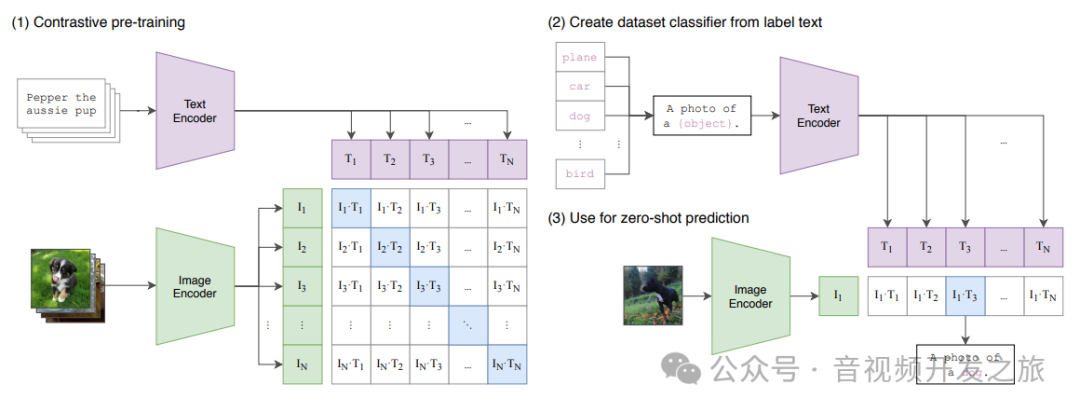
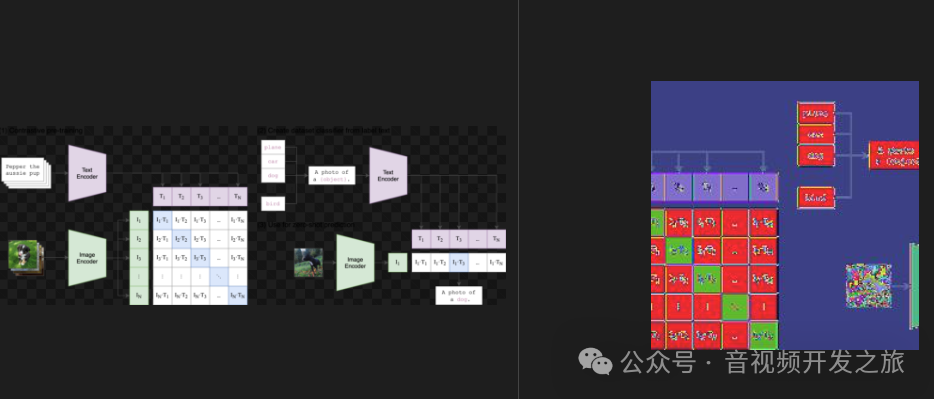
CLIP(Contrastive Language-Image Pre-training)是由OpenAI在2021年发布的一种多模态训练的神经网络,采用了对比学习的思想, 对收集的4亿张图文对进行预训练. 通过图文Embedding相似度来实现分类,打破了之前固定标签的范式. 无论是在手机数据集还是模型训练,都不需要像ImageNet-1000那样做分类,直接手机文字-图像对,然后用无监督的方式进行预测相似性.
模型训练: 每一张图像都有一小句解释性文字,将文字和图片分别通过一个编码器,得到向量表示, 对角线为正样本,非对角线为负样本,然后计算余弦相似度, 整体上采用双塔模型:图像塔和文本塔。图像塔负责提取图像表征,一般为Vision Transformer, 文本塔则负责提取文本特征,使用经典Transformer架构。
模型推理: clip推理过程不依赖传统的分类层,而是直接通过图像和文本Embedding之间的相似度来实现分类
Clip只开源了推理代码和预训练模型,论文中提供了下面的训练伪代码
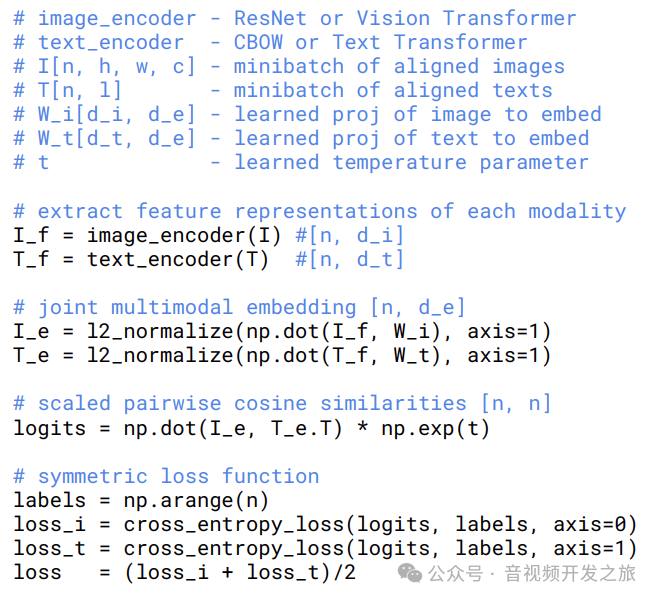
可以看出和上面的模型架构一致:
-
首先对Image和Text分别通过图像和文本编码器进行特征提取
-
然后把图像和文本的特征向量经过投影矩阵W_i和W_t,映射到相同维度的潜在空间,然后进行归一化,得到图像和文本的Embedding表示
-
接着计算图像Embedding和文本Embedding的余弦相似度,并通过temperature(温度)参数进行缩放
-
最后分别计算图像到文本和文本到图像的交叉熵,取两者均值作为最终的loss
三. 实验结果
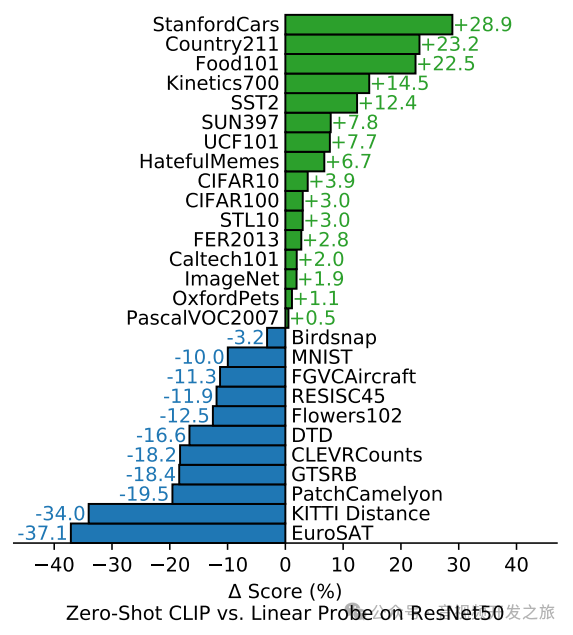
作者在30个数据集上,对zero-shot的Clip和Linear probe的ResNet50进行对比,可以clip可以达到和ResNet50在特定的标注好的数据集上训练后的模型水平相当
zero-shot Clip 的泛化能力
下图使用在ImnageNet数据集预训练的RestNet101和Zero-shot的Clip进行对比, 在ImageNet数据集上准确率都为76.2%,表现相当,但是迁移到其他数据集上,Zero-shot Clip明显更优,体现了其更好的泛化性和撸棒性.
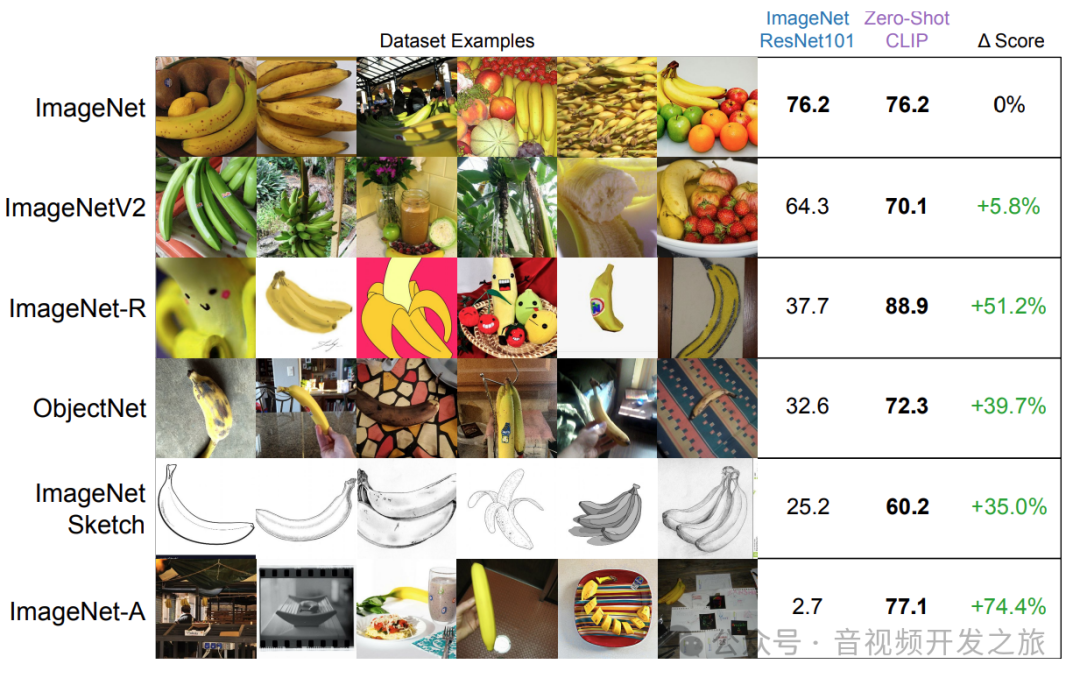
除了分类任务外,CLIP模型已经在许多视觉和语言任务中展现出很好的性能,图像分类、零样本分类、语义分割、图像生成的指导、图像问答
四. 源码解析
4.1 demo
输入一张图片, 多个文本label, 预测图片为每个label的概率.
-
首先对图像进行resize,crop归一化等预处理到模型需要的shape:torch.Size([1, 3, 224, 224]);对text进行SimpleToken转为token,一个英文单词对应一个token(后面会有详细示例说明)
-
然后分别对image和text进行特征提取,其中 image使用VIT作为backbone,text使用TransformerEncoder作为backbone.
-
最后 经过softmax输出 图片为每个label的概率
import numpy as npimport pytestimport torchfrom PIL import Imageimport clipdef test(model_name="ViT-B/32"):device = "cuda" if torch.cuda.is_available() else "cpu"model, preprocess = clip.load(model_name, device=device)image = preprocess(Image.open("CLIP.png")).unsqueeze(0).to(device)#对图片进行resize crop 转为张量 归一化处理 -->输入:image mode=RGBA size=2162x762; 输出:torch.Size([1, 3, 224, 224])text = clip.tokenize(["a diagram", "a dog", "a cat"]).to(device)with torch.no_grad():image_features = model.encode_image(image) #对image通过VIT进行特征提取. 输入:torch.Size([1, 3, 224, 224]) 图像的tensor数据,输出:torch.Size([1, 512])text_features = model.encode_text(text) #对text通过Transformer进行特征提取.输入torch.Size([3, 77]) 对应["a diagram", "a dog", "a cat"]词的tokens,输出:torch.Size([3, 512])logits_per_image, logits_per_text = model(image, text)probs = logits_per_image.softmax(dim=-1).cpu().numpy()#经过softmax输出 图片为每个label的概率print("Label probs:", probs)if __name__ == "__main__":#clip.available_models:['RN50', 'RN101', 'RN50x4', 'RN50x16', 'RN50x64', 'ViT-B/32', 'ViT-B/16', 'ViT-L/14', 'ViT-L/14@336px']print(f"clip.available_models:{clip.available_models()}")test()
4.2 文字转为token: clip.tokenize
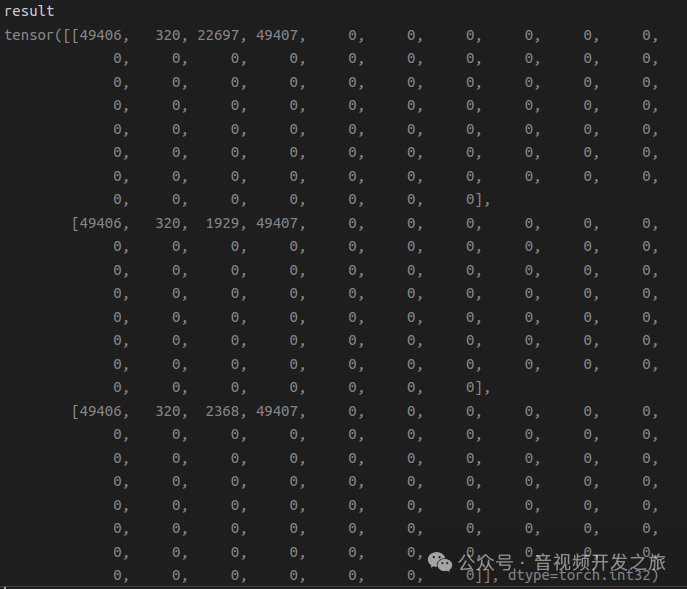
def tokenize(texts: Union[str, List[str]], context_length: int = 77, truncate: bool = False) -> Union[torch.IntTensor, torch.LongTensor]:"""返回给定输入字符串的tokens"""if isinstance(texts, str):texts = [texts]sot_token = _tokenizer.encoder["<|startoftext|>"]#49406eot_token = _tokenizer.encoder["<|endoftext|>"] #49407all_tokens = [[sot_token] + _tokenizer.encode(text) + [eot_token] for text in texts] #加上开头和接口的token [[49406, 320, 22697, 49407], [49406, 320, 1929, 49407], [49406, 320, 2368, 49407]]result = torch.zeros(len(all_tokens), context_length, dtype=torch.int) #for i, tokens in enumerate(all_tokens):if len(tokens) > context_length:#context_length:77,如果tokens的长度大于context_length,做截断处理或者抛异常if truncate:tokens = tokens[:context_length]tokens[-1] = eot_tokenelse:raise RuntimeError(f"Input {texts[i]} is too long for context length {context_length}")result[i, :len(tokens)] = torch.tensor(tokens)#转为张量赋值给resultreturn result #torch.Size([3, 77]) ,['a diagram', 'a dog', 'a cat']的tokens
['a diagram', 'a dog', 'a cat']的tokens shape为 torch.Size([3, 77]) ,具体内容如下图,其中49406是每个tokens的startToken,49407是每个tokens的endToken. 可以看出基本一个英文单词对应一个token
4.3 图像预处理 preprocess
def _transform(n_px):return Compose([Resize(n_px, interpolation=BICUBIC), #默认3*224*224CenterCrop(n_px),_convert_image_to_rgb,ToTensor(),Normalize((0.48145466, 0.4578275, 0.40821073), (0.26862954, 0.26130258, 0.27577711)), #使用ImageNet的均值方差进行归一化])
4.4 构造clip模型
class CLIP(nn.Module):def __init__(self,embed_dim: int,#512# visionimage_resolution: int,#224vision_layers: Union[Tuple[int, int, int, int], int], #12vision_width: int,#768vision_patch_size: int,#32# textcontext_length: int,#77vocab_size: int,#49408transformer_width: int,#512transformer_heads: int,#8transformer_layers: int #12):super().__init__()self.context_length = context_lengthif isinstance(vision_layers, (tuple, list)):vision_heads = vision_width * 32 // 64self.visual = ModifiedResNet(layers=vision_layers,output_dim=embed_dim,heads=vision_heads,input_resolution=image_resolution,width=vision_width)else:vision_heads = vision_width // 64 #768//64=12self.visual = VisionTransformer( #定义用于Image特征提取的Transformerinput_resolution=image_resolution, #输入图像分辨率224*224patch_size=vision_patch_size, #每个patch的大小32*32width=vision_width, #768,这个vision_width是什么?layers=vision_layers, #12个layerheads=vision_heads, #multi-headattention 8个头output_dim=embed_dim #输出维度 512)self.transformer = Transformer(width=transformer_width,#512layers=transformer_layers,#12heads=transformer_heads,#8attn_mask=self.build_attention_mask())self.vocab_size = vocab_size #词库大小 49408self.token_embedding = nn.Embedding(vocab_size, transformer_width) #transformer_width:512self.positional_embedding = nn.Parameter(torch.empty(self.context_length, transformer_width))self.ln_final = LayerNorm(transformer_width)self.text_projection = nn.Parameter(torch.empty(transformer_width, embed_dim))self.logit_scale = nn.Parameter(torch.ones([]) * np.log(1 / 0.07))self.initialize_parameters()def initialize_parameters(self):nn.init.normal_(self.token_embedding.weight, std=0.02) #将文本token的embedding权重初始为均值为0,标准差为0.02的正态分布nn.init.normal_(self.positional_embedding, std=0.01) #将positional_embedding权重初始为均值为0,标准差为0.01的正态分布if isinstance(self.visual, ModifiedResNet):if self.visual.attnpool is not None:std = self.visual.attnpool.c_proj.in_features ** -0.5nn.init.normal_(self.visual.attnpool.q_proj.weight, std=std)nn.init.normal_(self.visual.attnpool.k_proj.weight, std=std)nn.init.normal_(self.visual.attnpool.v_proj.weight, std=std)nn.init.normal_(self.visual.attnpool.c_proj.weight, std=std)for resnet_block in [self.visual.layer1, self.visual.layer2, self.visual.layer3, self.visual.layer4]:for name, param in resnet_block.named_parameters():if name.endswith("bn3.weight"):nn.init.zeros_(param)proj_std = (self.transformer.width ** -0.5) * ((2 * self.transformer.layers) ** -0.5)attn_std = self.transformer.width ** -0.5fc_std = (2 * self.transformer.width) ** -0.5for block in self.transformer.resblocks:nn.init.normal_(block.attn.in_proj_weight, std=attn_std)nn.init.normal_(block.attn.out_proj.weight, std=proj_std)nn.init.normal_(block.mlp.c_fc.weight, std=fc_std)nn.init.normal_(block.mlp.c_proj.weight, std=proj_std)if self.text_projection is not None:nn.init.normal_(self.text_projection, std=self.transformer.width ** -0.5)def build_attention_mask(self):# lazily create causal attention mask, with full attention between the vision tokens# pytorch uses additive attention mask; fill with -infmask = torch.empty(self.context_length, self.context_length)mask.fill_(float("-inf")) #全部填充为负无穷大mask.triu_(1) # zero out the lower diagonal,把下三角设置为0.进行softmax时softmax(-inf)为0 起到了mask作用return mask@propertydef dtype(self):return self.visual.conv1.weight.dtypedef encode_image(self, image):return self.visual(image.type(self.dtype)) #self.dtype:torch.float16def encode_text(self, text):x = self.token_embedding(text).type(self.dtype) # [batch_size, n_ctx, d_model] ,输入torch.Size([3, 77]),输出 torch.Size([3, 77, 512])x = x + self.positional_embedding.type(self.dtype)#self.dtype:torch.float16 加上位置编码 ,输出还是torch.Size([3, 77, 512])x = x.permute(1, 0, 2) # NLD -> LND #输出 torch.Size([77, 3, 512])x = self.transformer(x) #进行transormerEncoder(由多层MultiHeadAttention和MLP组成)特征提取,输出和输入shape一致.torch.Size([77, 3, 512])x = x.permute(1, 0, 2) # LND -> NLD 输出torch.Size([3, 77, 512])x = self.ln_final(x).type(self.dtype) #进行layerNorm归一化# x.shape = [batch_size, n_ctx, transformer.width]# take features from the eot embedding (eot_token is the highest number in each sequence)x = x[torch.arange(x.shape[0]), text.argmax(dim=-1)] @ self.text_projection #text.shape为torch.Size([3, 77]), self.text_projection为torch.Size([512, 512])return xdef forward(self, image, text):image_features = self.encode_image(image)text_features = self.encode_text(text)# normalized features 特征归一化处理image_features = image_features / image_features.norm(dim=1, keepdim=True)text_features = text_features / text_features.norm(dim=1, keepdim=True)# cosine similarity as logitslogit_scale = self.logit_scale.exp() #余弦相似度logits_per_image = logit_scale * image_features @ text_features.t()logits_per_text = logits_per_image.t()# shape = [global_batch_size, global_batch_size]return logits_per_image, logits_per_text
4.5 图像特征提取 VisionTransformer
class VisionTransformer(nn.Module):def __init__(self, input_resolution: int, patch_size: int, width: int, layers: int, heads: int, output_dim: int):super().__init__() #input_resolution:224; patch_size:32; width:768; layers:12; heads:12; output_dim:512self.input_resolution = input_resolution #224self.output_dim = output_dim #512self.conv1 = nn.Conv2d(in_channels=3, out_channels=width, kernel_size=patch_size, stride=patch_size, bias=False) #使用CNN进行特征提取作为Embeddingscale = width ** -0.5 #with的平分根 分之一self.class_embedding = nn.Parameter(scale * torch.randn(width)) #随机生成一个分类embeddingself.positional_embedding = nn.Parameter(scale * torch.randn((input_resolution // patch_size) ** 2 + 1, width)) #随机初始化PEself.ln_pre = LayerNorm(width)self.transformer = Transformer(width, layers, heads)self.ln_post = LayerNorm(width)self.proj = nn.Parameter(scale * torch.randn(width, output_dim))def forward(self, x: torch.Tensor):x = self.conv1(x) # shape = [*, width, grid, grid] 输入:torch.Size([1, 3, 224, 224]),输出torch.Size([1, 768, 7, 7]) 一张224*224的图片横纵都切分为7分,每个patch的wh为224/7=32, 768为维度数量x = x.reshape(x.shape[0], x.shape[1], -1) # shape = [*, width, grid ** 2] 输出torch.Size([1, 768, 49])x = x.permute(0, 2, 1) # shape = [*, grid ** 2, width] #输出torch.Size([1, 49, 768])x = torch.cat([self.class_embedding.to(x.dtype) + torch.zeros(x.shape[0], 1, x.shape[-1], dtype=x.dtype, device=x.device), x], dim=1) # shape = [*, grid ** 2 + 1, width] #在patchEmbdding前加入一个classToken,输出:torch.Size([1, 50, 768])x = x + self.positional_embedding.to(x.dtype) #在PatchEmbdding后加上PositionEmbedding ,输出还是torch.Size([1, 50, 768])x = self.ln_pre(x) #进行LayerNorm归一化x = x.permute(1, 0, 2) # NLD -> LND ,输出torch.Size([50, 1, 768])x = self.transformer(x) #进行VIT特征提取,输出和输入的shape一致, 还是torch.Size([50, 1, 768])x = x.permute(1, 0, 2) # LND -> NLD,输出torch.Size([1, 50, 768])x = self.ln_post(x[:, 0, :]) #输出torch.Size([1, 768]),保留第一维的dimif self.proj is not None:#self.proj.shape为torch.Size([768, 512])x = x @ self.proj #输出torch.Size([1, 512])return x
4.6 文本特征提取Transformer
class ResidualAttentionBlock(nn.Module):def __init__(self, d_model: int, n_head: int, attn_mask: torch.Tensor = None):super().__init__()self.attn = nn.MultiheadAttention(d_model, n_head) #d_model:512, n_head:8, d_head=d_model/n_head=64self.ln_1 = LayerNorm(d_model)self.mlp = nn.Sequential(OrderedDict([("c_fc", nn.Linear(d_model, d_model * 4)),("gelu", QuickGELU()),("c_proj", nn.Linear(d_model * 4, d_model))]))self.ln_2 = LayerNorm(d_model)self.attn_mask = attn_maskdef attention(self, x: torch.Tensor):self.attn_mask = self.attn_mask.to(dtype=x.dtype, device=x.device) if self.attn_mask is not None else Nonereturn self.attn(x, x, x, need_weights=False, attn_mask=self.attn_mask)[0]def forward(self, x: torch.Tensor):x = x + self.attention(self.ln_1(x))x = x + self.mlp(self.ln_2(x))return xclass Transformer(nn.Module):def __init__(self, width: int, layers: int, heads: int, attn_mask: torch.Tensor = None):super().__init__()self.width = width #768self.layers = layers #12self.resblocks = nn.Sequential(*[ResidualAttentionBlock(width, heads, attn_mask) for _ in range(layers)]) #定义12层AttentBlockdef forward(self, x: torch.Tensor):return self.resblocks(x)
五. CLIP的局限性和不足
1. 虽然在很多数据集上zero-shot Clip和ResNet50表现相当,但是对应的任务上ResNet50表现并不是最优,Clip与那些SOTA的相比还是有不少差距,如果按照大模型+大数据训练成本和效果的范式进行预估,至少是现有Clip训练成本的1000倍
2. 在一些细分类数据集(eg:医疗)clip的准确率低于Resnet50
3. 在一些抽象的复杂的任务上,clip泛化比较差,eg:区分视频中某一帧是否异常
4. 如果推理数据和训练数据相差甚远(out of distribution),clip泛化也比较差,eg:在手写数字的数据集
5. 虽然clip可以做zero-shot,但是还是从给动的图-文对中进行相似度计算来选择,相比而言,生成式会更加灵活
六. 资料
1.论文:https://arxiv.org/pdf/2103.00020
2.源码:https://github.com/openai/CLIP
3.李沐-CLIP 论文逐段精读 https://www.bilibili.com/video/BV1SL4y1s7LQ
4.多模态模型学习1——CLIP对比学习 语言-图像预训练模型https://blog.csdn.net/weixin_44791964/article/details/129941386
5.多模态表征—CLIP及中文版Chinese-CLIP:理论讲解、代码微调与论文阅读 https://blog.csdn.net/weixin_44362044/article/details/136262247
6.openai多模态大模型:clip详解及实战 https://blog.csdn.net/lsb2002/article/details/132275132
7.深度学习系列37:CLIP模型https://blog.csdn.net/kittyzc/article/details/125167223
8.【代码实践】使用CLIP做一些多模态的事情https://blog.csdn.net/me_yundou/article/details/123236173
9.两个小时浅析CLIP模型,内含原理+代码复现 https://www.bilibili.com/video/BV1K1421U7jc/?vd_source=03a763fa6cf49b01f658f32592f5a6f3
10.一文读懂CLIP图文多模态模型 https://blog.csdn.net/weixin_47228643/article/details/136690837
11.多模态经典之作CLIP https://juejin.cn/post/7264503343996747830
12.李沐论文精读系列四:CLIP和改进工作串讲(LSeg、GroupViT、VLiD、 GLIPv1、 GLIPv2、CLIPasso)https://blog.csdn.net/qq_56591814/article/details/127421979
13.AI绘画原理解析:从CLIP、BLIP到DALLE、DALLE 2、DALLE 3、Stable Diffusion https://blog.csdn.net/v_JULY_v/article/details/131205615
14.图片来自:Zero-shot, One-shot和Few-shot的理解 https://blog.csdn.net/wzk4869/article/details/129419127
感谢你的阅读
接下来我们继续学习输出AI相关内容,欢迎关注公众号“音视频开发之旅”,一起学习成长。
欢迎交流